
Recently we had an issue on our OAC box where Oracle Support asked us to perform a series of steps to run scripts and obtain logs. This should not have taken days (really) to gather, but because the documentation is both incomplete and scattered, I thought I would document what actually worked so you can do this in a matter of minutes versus days.
There are really 3 parts to this blog post:
- How to SSH to OAC
- How to run MaxL via command line in the cloud
- Obtaining Essbase Cloud Service diagnostic logs for Oracle Support
They all build on each other so it makes sense to lump them together but I’ll still break them down into 3 groups so that if you need just one of the parts, you can access that portion quickly.
How to SSH to OAC
- The first thing you need in order to SSH to OAC is to have a copy of the private key on your local machine. When you created your OAC instance, you should have been given the opportunity to download both the private and public key.Record the location of the private key.
- I am connecting via a Mac, so I have the built in luxury of SSH capabilities. If you are running Windows, you will need to download puTTY (or something similar) so you can access the boxes.
- Once you have all the initial steps in place, you will need to enter the following on the command line (for Linux/Mac) users
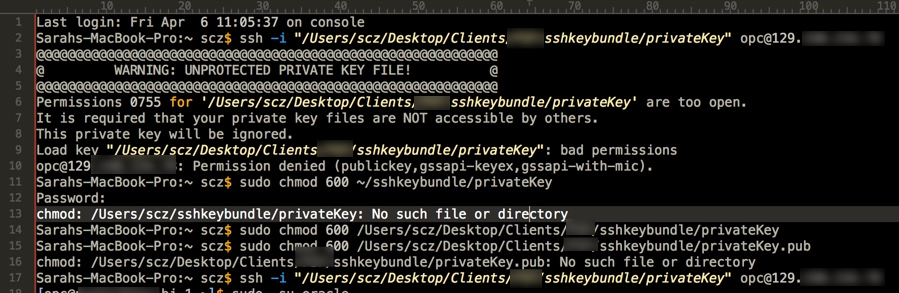
ssh -i “file location for private key” opc@IPAddress
Example from below (customer and IP address identifiers removed):
ssh -i “/Users/scz/Desktop/Clients/ClientA/sshbundle/privateKey” opc@129.1.1.1
The private key acts as your password for user opc.
- The first time you do this, you will get an error stating that your permissions are too open. This is an easy fix that needs to be applied to your machine – enter the following 2 commands, customized to your private key location:
sudo chmod 600 /Users/scz/Desktop/Clients/ClientA/sshkeybundle/privateKey
sudo chmod 600 /Users/scz/Desktop/Clients/ClientA/sshkeybundle/privateKey.pub - Once you have done this, you should be able to use the ssh command again with success!
How to run MaxL via command line in the cloud
- Once you have SSH’ed to OAC you can access a multitude of options, files, and commands. We are concerned about MaxL. The first thing you need to do is run as user oracle by using the following command:
sudo -su oracle
- Next, run the startMAXL.sh script by using the following command (note: the period in front of the slash mark tells the system to run the script):
./domains/esscs/esstools/bin/startMAXL.sh - From here, you can run normal MaxL commands.

Obtaining Essbase Cloud Service diagnostic logs for Oracle Support
- Once you have SSH’ed to OAC, change your user status using the following command:
sudo su oracle –
- This is where my experience differed from Oracle documentation. I had to migrate to the directory where the script was stored:
cd /bi/app/public/bin - Once here, I could run the Python script:
python collect_diagnostic_logs.py /tmp/EssbaseLogs.zip**Note that adding “.zip” to the end of the EssbaseLogs ended up being redundant (again, documentation stated differently) so my actual file name ended up being EssbaseLogs.zip.zip.The process will complete.
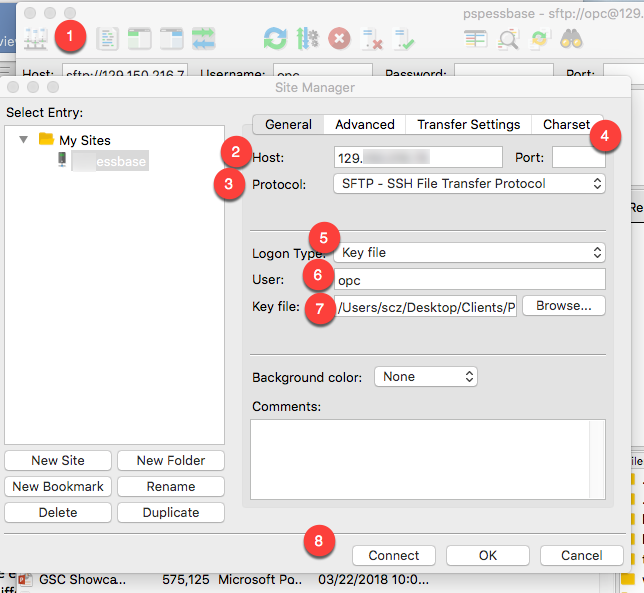
- Supposedly you can use the scp command to download your zip file, but I cannot do so (and Support isn’t sure why), so I decided to use FileZilla to download my log file.In FileZilla (or puTTY), you will need to do something special for your connection… Create the following:

- First, create a special connection versus a Quick Connection.
- Enter your OAC IP address.
- Choose SFTP as the protocol.
- The port is 22.
- Choose key file as the logon type (this is password, basically).
- The user is opc.
- Browse to your private key for the key file.
- Click “Connect”.
- This will bring up your machine so you can migrate to the log file location then copy to your machine.

- Upload that file to Oracle Support and you are all set.


2 comments